Welcome!

Welcome to my blog about Soapmaking and a little bit of other stuff! Please visit my etsy shop, Soap by Em!

Saturday, November 16, 2013

Hints, Tips, and Tricks for Homemade Soap (hot process soap cold process soap)


I wanted to share some things that I have learned in making soap the past 6 months.  In no particular order:  

Budgeting:
  • Do not bother paying anyone for a lye source.  While it may be hard to find locally, it is easy to get online via soap suppliers or my favorite, The Lye Guy.  Locally, I buy lye soap at Rural King.  However, don't ask for lye, the sales people will look at you cross eyed.  Go to the plumbing section and look for Roebic Crystal Drain Opener.  I have looked at other stores and Roebic is the only drain opener I have found that is pure enough to use for soap.
  • Have a budget!  Soap supplies can get pricy.
  • Shop around for the best deals.  Compare prices at soap suppliers and make sure you consider pros and cons.  For instance, Brambleberry includes a free sample of fragrance with every order.  Nature's Garden includes a silk flower that has been scented with a fragrance.  As fragrances can morph in soaps, the actual product is more useful to me.

Supplies: 
  • A silicone bread pan makes an awesome soap mold for beginners. 
  • Only use fragrances that are safe for use in soap.  Some candle fragrances are not soap safe.  Make sure you check before you buy.
  • I bought a crockpot online after goodwill was not fruitful.  I wanted one with a removable crock.  I wish I had gotten one with a warm setting in addition to low and high because it would give me more temperature options.  Don't bother looking for a crockpot with a timer.
Process

  • Two pounds became my size of choice.
  • MEASURE, Measure, measure!!!  Precision matters!  You could end up with a soap that is lye heavy or not soap.
  • Have patience.  Soap needs time to cure.
  • Clean your workspace before and after you make soap.  I keep a bottle of vinegar water with a little essential oil that I use.  This is to prevent cross contamination of soap (and food).  Also, the debate, "is that lye or is that splenda?" sucks and isn't worth it.
  • The few lye burns I have had were mostly caused by poor glove safety.  Wear gloves.  Wear goggles.  I have only had one lye burn caused by static and I also decided to use a flat spatula to transfer lye as opposed to a spoon.
  • The lye burns I have had all started with a pleasant warm feeling that changed into a burning sensation.  So if you feel a pleasant warm feeling, don't wait for the burn!  Rinse it off!  I have read that vinegar is not safe to wash off lye because it will create more heat, and that you have to use vinegar to rinse off lye.  In my experience, the vinegar stops the burning.

Wednesday, August 28, 2013

Flock of Little Birds Contest Entry

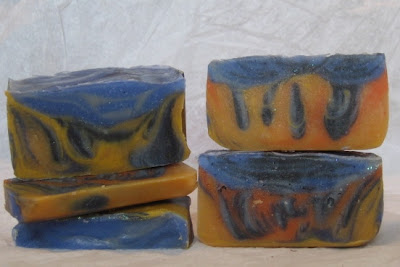
I was thrilled to read about SJ Tucker's contest with art inspired by lyrics to a new song, "Little Bird."  I'm fairly certain I will be the only contestant to use soap as a medium!  The lyrics that struck a chord with me were "Little Flame" and "Little Thunderstorm."  So here is my little flame and little thunderstorm soap!

I used Coconut Oil, Palm Oil, Sunflower Oil, Vitamin E, and shea butter, and added them to distilled water and lye to create the soap base.  I scented the soap with essential oils of litsea cubea, orange valencia, and peppermint.  Finally, I added oxides and some charcoal to color the batter and poured it into my mold.  The technique I used created drops of water in the flamey portion.  It smells minty and spicy.

Flame and Thunderstorm

Beauty Shot

flame and thunderstorm
I love the drops of water!

Tuesday, August 27, 2013

Cutting Flower Power

I cut flower power!

I love all the different colors, but next time I will not do the two vertical lines through the soap.  I think that they take away from the overall look.  Also, I will try to use smaller glops of soap or fewer colors- it ended up very busy.

Find it on etsy here: https://www.etsy.com/listing/160453140/flower-power-handmade-patchouli-cold

Wednesday, August 21, 2013

Flower Power

Today I made lotion bars for the first time that I hope will turn out well.  I also made a batch of Patchouli soap.  I used a variety of oxides to color the soap (I think I used every color I had) and glopped it in similar to the spoon technique.  I did a little decorating on the top and two strokes all the way through the soap.

I really liked the spoon swirl technique look and I hope the swirling I did helped.  It was hard to stop swirling! I was having fun but I did not want it to get muddy.  Not the look I was going for.

Tuesday, August 20, 2013

Dinner Rolls

I found this recipe via pinterest and decided to tweak it for my own needs/ wants.  

Ingredients

1 cup + 2 tablespoons warm water (hot tap water is usually the right temperature for yeast, but you might want to check yours if you don't frequently bake)
1/3 cup oil
2 teaspoons yeast
1/4 cup sugar
1/2 teaspoon salt
1 egg
2 1/2 cup white flour + more for kneading

1/3 cup flax seeds
1/3 cup whole wheat flour
1/3 cup old fashioned oatmeal

Directions
Combine water, oil, sugar, and yeast in the bowl of a stand mixer.  While it proofs, pulse oatmeal in a [clean] coffee grinder until ground (optional).  Mix flours, flax, oatmeal, & salt. 

Add dry ingredients and egg to yeast mixture.  Use dough hook and knead until it does not stick to the sides.  I had to add a little more flour.

Cover the top with oil and a hot damp towel and let rise for about an hour.

Break into 16 spherical rolls and let rise again.  (Optional: freeze portion of recipe for fresh baked rolls later.)

Bake at 350 until done (about 15 minutes in my vintage oven).  

If you don't have time for the double rise, definitely check out Koti Beth's version linked above as it is a quick rise recipe.


Monday, July 15, 2013

Merry Christmas!

Celebrate Christmas in July with coupon code JULYSNOW to save 15% until July 22 at my etsy shop! http://www.etsy.com/shop/SoapbyEmily


Wednesday, June 26, 2013

Bastille Soap

This morning I experimented with a Bastille (mostly olive oil) Soap.  I based it on this recipe from the magnanimous Soap Queen, but used goat milk in oil and infused my oils with calendula and chamomile.  I left it unscented to be really gentle and superfatted it at 7%.


Since red mica turns peachy orange, I did a swirl on top with it.
Here is a before pic:

I had a lot of leftover red mica and it was difficult not to use it all up.  But I stopped swirling when it was pretty.

Monday, June 24, 2013

Borax

I came home from a wonderful family weekend to find... beetles in my basement.  Ewww! Doesn't sound so bad until I mention that I'm living in the basement-- the air conditioner upstairs is turned off so I can save on utility bills.  So far, I've only seen them on the carpet and they generally move with a purpose from left to right.

I also found a lot of dead beetles... a few google searches later I mixed some borax, flour, sugar, with a little chilli powder and sprinkled it around the baseboards.  The recipes for the bait were pretty generic, and I was very unscientific about mine.  Probably about 1-2 cups borax with 1/3 cups each flour and sugar.  I threw in chili powder because it was a part of the pet friendly remedy we used last summer.  No pets to eat the borax now.  Cocoa powder was also suggested but I wanted the overall mix to be more the color of the carpet to prevent further discoloration of the carpet.  There is a red stain from cinnamon/ chili powder that I can't vacuum up or get to with the carpet cleaner.

I have leftover mix stored and labeled.

This got me wondering-- what is borax, anyway?  Most bloggers who I have come across are pro, neutral (but do not use it) or seriously anti borax.  But I haven't found any good reasons as to why.  Let's find out.

According to Borax's youtube channel, Borax provides a laundry boost by softening water, changing the pH to better lift stains, and keep them lifted so they do not redeposit on clothes.   I first bought borax for laundry so yay.  It is harvested from evaporated lakes or made synthetically.

The Environmental Working Group does not recommend Borax for use in cleaning.  The website offers alternatives for scrubbing stuff without borax.  They also add that borax can be found in nutritional supplements and sticky play material.  So you might consider making playdoh or goop instead of using commercial product with children who are too young not to eat it.

Chemistry wise, here is a discussion of borax.

It looks like I will be saving borax for the laundry in the future.  I will keep you posted about the critters.

Friday, June 7, 2013

Soap Oops-es

Yesterday was not a great day for me soaping.  I had two fails learning experiences.  A sugar scrub didn't emulsify and playing with new toys didn't work well either.

First, I'd become enamored with the solid sugar scrubs over at Rebecca's Delicatessen.  She's one of my favorite soapy bloggers and has a great, well informed site.  I didn't have the ingredients that her recipe called for, so I used the recipe at Soap Queen, substituting crafter's choice Mango Butter base and rice bran oil and adding a bit of shea butter.  It didn't emulsify.  I ended up with a layer of scrub and oil floating on top.

  • I used a cheaper base.
  • I assumed that rice bran was a good substitute for sweet almond oil but maybe not.
  • The air conditioner is not on upstairs here, so they were sitting out at 85+ F.
I tried to salvage this by popping it in the freezer.  The top layer did freeze, but melted by the time I cut the bars into smaller rectangles.  I haven't used them.  I think they will still be scrubby, but not quite as luxurious as I wanted.

I got a new box of goodies from Brambleberry! Including my first wooden soap mold.  I was super excited to try it out and picked this recipe to try.  I loved the colors.  I received a free sample of coconut lemongrass fragrance in the box and figured that would be a great summery, beachy fragrance.
What went wrong:

  • I substituted Lots of Lather quick mix for Basic Quick Mix.  This was not a good substitution for this recipe.  
    • Brambleberry suggests using an olive oil free recipe for this soap to avoid the yellow green color of olive oil.  Lots of Lather has lots of olive oil.
    • The recipe calls for 23 pounds of the quick mix.  I had 33 pounds of lots of lather mix, and decided to use the whole bag.  I did run in through the lots of lather lye calculator, but did not anticipate how much extra I would have.  This probably influenced my colors as well; the olive oil and greater amount of oils.  I had extra molds but not enough and had to grab more.
  • I mixed with a stick blender until I got an emulsion, not a light trace.  
  • I hated the fragrance.  I'm a big fan of Bath and Bodyworks' Coconut Lime Verbena and expected the type to be more similar.  I hope that the soaping process will improve the fragrance.
  • The sea clay did not play well with the fragrance.  It kind of appeared ricy.  It might have been ricy.
  • The sea clay colored soap was not contrasted well with the plain soap, due to the olive oil in the base.  Instead of three, separate and intentional colors, it appears [to me] that the colors were mistakes.
  • Finally, I had my first lye burn.  This was either from removing my gloves (which were a size too small) or reusing my lye water container to mix colors.  It was a small burn, luckily, smaller than a dime.  I noticed that there was a shiny patch of something on my arm, and it started to burn.  I rinsed it with water and it still burned.  So I rinsed it with vinegar, which I should have done first.
First three color soap

The soap looks prettier on screen than in real life.

I also unmolded a soap sample too quickly and it smushed.  I put another sample from the batch in a silicone cupcake liner and some of the red from the liner leached into the soap.  Grr.

In happier news, a trial batch of these dishwasher tablets worked great.  I used a little peppermint essential oil, but not enough to leave a peppermint residue.

My color fails led me to research color mixing in soaps and I found this series very helpful.

I have so much that I want to try and being patient is hard.  /end grump

Thursday, May 16, 2013

Cold processed soap

Tuesday I made my first batches of cold process soap... and was so nervous that I forgot to take pictures of it!  There are many great tutorials free on the internet, and I don't feel comfortable posting a tutorial after only making 2 batches.  But I will talk about the process a bit.

First, I did research about soap.  I'm still learning, so this research is not done.  :)  I did a cold process soap. I decided to launch this before I really understood what hot process soap is.  Let's talk about definitions.


  • Melt and pour soap: commercial based soaps are melted in a double boiler or microwave. This takes about 1-3 minutes. Color, scent, oils, and or other add ins are added, the soap is poured into molds.  Soap is ready to use in 24 hours or less.
  • Rebatching, French Milled, or triple milled soap: Commercial or homemade soap is melted in a boil safe oven bag-- this takes about an hour.  Color, scent, oils, and or other add ins are added, the soap is poured into molds.  Soap is ready to use in 24 hours or less.
  • Cold process soap- lye water is added to [hot] oils and blended.  Color, scent, oils, and or other add ins are added, the soap is poured into molds.  Soap is removed from molds and set to cure which can take up to six  weeks, six months, or longer.
  • Hot process soap- lye water is added to hot oils and cooked in a crockpot for about an hour.  This speeds up the saponification and curing process.  Color, scent, oils, and or other add ins are added, the soap is poured into molds.  Soap is removed from molds and set to cure which can take up to six  weeks, six months, or longer, but generally shorter than a cold process soap.


My biased internet searching revealed more information about cold process soap than hot process soap.  I assume it is for want of a crockpot.  I used the cold process method.

Cold or hot processed soap making requires lye.  Basically,

  • lye is a very caustic and dangerous substance.  It can be hard to find, I think I got the last container of it from my local tractor supply store.
  • lye + water  gets hot.  Always add lye to water as the reverse can volcano.  I used a candy thermometer and it got to around 200 F.  The thermometer goes much higher, but lye water is more dangerous than sugar water.
  • lye water + oil = a chemical change (saponification) that creates heat as they combine to create soap.
  • water discount (not recommended for beginners) is adding less water to speed up the process.
  • superfatting is adding extra oil so the lye does not change all the oil to soap.  This provides extra moisturizing, skin happy goodness-- but can decrease lather.
There were videos that ranged from a high, medium, and low caution of lye.  I can be clumsy and used a high caution-- goggles, gloves, long sleeved shirt, pants, and shoes.  I made sure I was home alone.  The cats stayed out of the kitchen.

Adding lye to water creates fumes.  I avoided these fumes and was surprised to find that I couldn't smell them at all.  Speaking of fumes, the 100% olive oil soap I made smelled like olive oil and was fairly stinky.

I think this is long enough for now! I'm off to felt some soap!


Monday, May 13, 2013

Liquid Dish Soap

I ran out of my first batch of homemade liquid dish soap today so I decided to make more.  I modified this recipe by omitting the vinegar (vinegar and liquid soap do not get along) and increasing the borax by 1 tablespoon. I used

1 1/2 cups boiling water
1/2 cup liquid lavender Castile Soap
2 TBSP Borax
1 TBSP Arm and Hammer Washing soda

I decided not to add essential oil due to the strong scent of the lavender.


  I am also happy to report that I have iced coffee steeping thanks to Pioneer Woman and Hostess with the Motzes.